
DIY Toy Story Pizza Planet Trunk or Treat: How to Make an Interactive Claw Machine
Nothing says 90s nostalgia quite like “The Clawwwww!”
And when a millennial mom with a love for DIY gets tasked with Trunk or Treat, you can bet we’re going to take that childhood nostalgia and run with it!
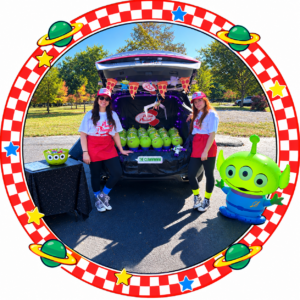
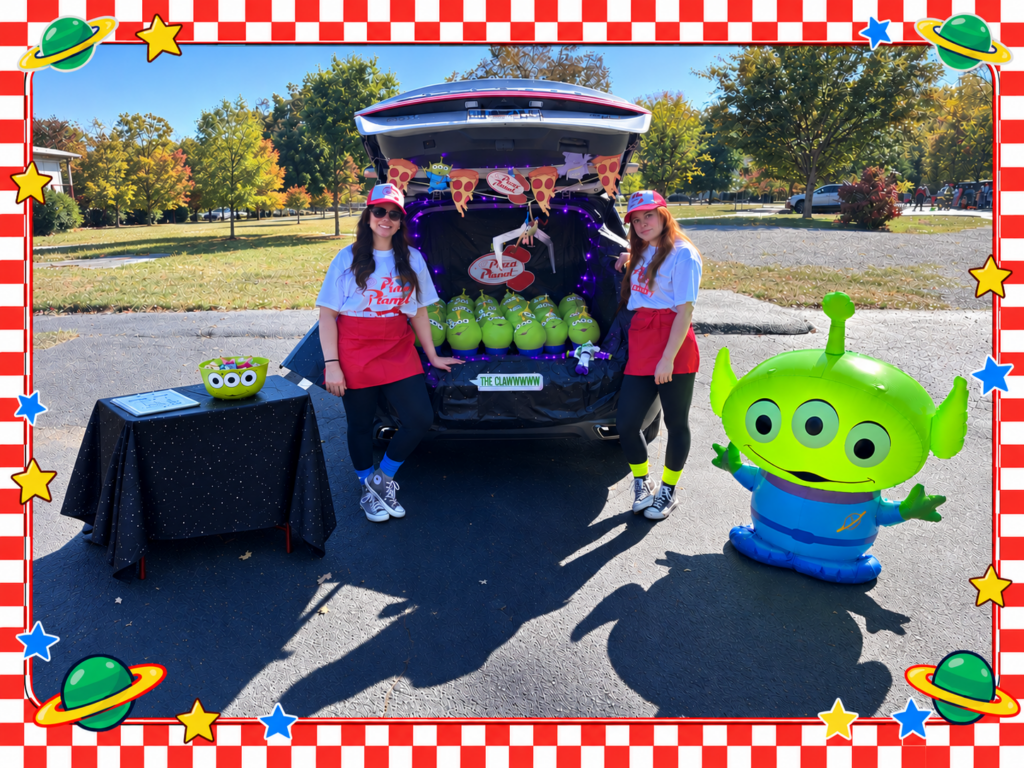
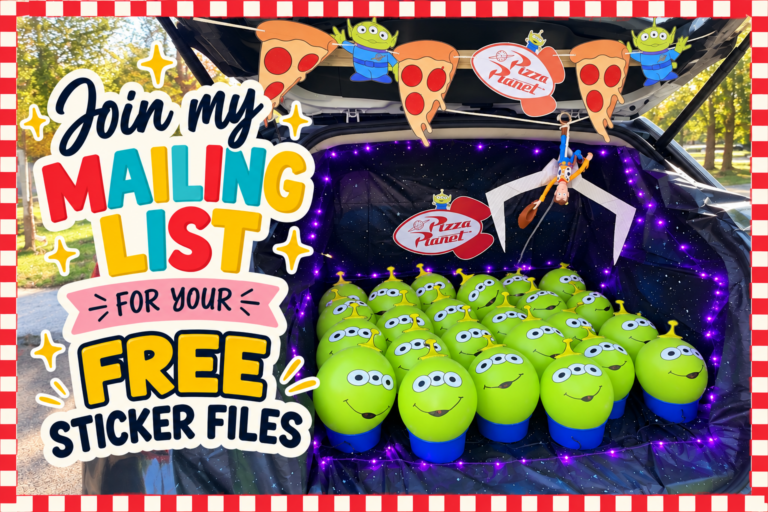
This year, I decided to transform the back of my SUV into a fully interactive Toy Story-inspired claw machine, complete with adorable little balloon aliens, Pizza Planet decorations, and a working claw that kids could actually control to win prizes.
And the best part? I made the entire thing using inexpensive materials, including a few things I already had lying around, and some good old-fashioned Crafty Gal skills.
I’ve got a Kindergartener this year, so I had my first opportunity to sign up for the PTO annual Trunk Or Treat. Of course, the first thing I did was take to Pinterest. When I came across a few posts that made little balloon aliens for a Pizza Planet theme, I was instantly committed. With the new movie that came out this year, I knew this theme was sure to be a hit. But there was one problem. Every photo that came up in my deep dive was a non functioning claw. I knew that wouldn’t fly with my kid, so I went wayyy too deep on trying to come up with an interactive WORKING solution. In the end I kept it super simple.
So if you’re looking for a unique Toy Story Trunk Or Treat idea that goes beyond just decorating your vehicle, I’m sharing exactly how I brought this interactive claw machine to life, including the mechanics, a faux cardboard claw, balloon aliens, and free files!
**This post contains affiliate links. Purchasing directly from these links may earn me a small commission with either Amazon or Walmart. Thanks so much for supporting my blog!**
Supplies For The Claw
A piece of lumber long enough to span the inside of your open trunk (Mine is roughly a 1×2″)
Flexible Rope ( I used thick macrame cord I had on hand similar to this one)
Elastic cord or bungee material ( I crocheted some flat sewing elastic to make it thicker and stretchier)
Metal O-ring (You can find something similar in the hardware section or jewelry supply section)
Cardboard
Scissors or utility knife
Hot glue gun and glue sticks
Small Woody toy (optional)
Strong Magnetic Refrigerator Clips
Supplies for The Aliens
Printable alien eyes and antenna sticker files
Cutting machine (or scissors if you have it in you)
Thick craft wire
Black permanent marker
Other Supplies For The Decor
Purple battery-operated string lights
Printed Pizza Planet banner
Straight pins for securing decorations to headliner and carpeted trunk surfaces
Additional Pizza Planet-themed decorations
FREE PRINTABLES:
I’ve created these free files that you can use to embellish your alien balloons. These are Inspired by toy story, but you’ll notice are not exactly the same. I opted to make the eyes touch so that they could be cut on one single sticker. You’ll need one eye and two antenna stickers for each balloon.
As far as the images that I used for the banners, I found them on Etsy but they are licensed. So I won’t be sharing them. You can set out to find an image you like best and purchase that file. I loaded the images into Canva and sized them to my liking to print. Once printed on cardstock, I punched holes and strung them up. The pizza image is a free image found on canva. For the large banner in the back and “the clawww” word bubble. I sent to to Walgreens to be printed on to poster material and cut them out by hand. I sized them so that I could fit both images on one poster and I used a coupon code to get a great price on that print.
Step 1: Creating the Interactive Claw Machine Mechanics
Before I got carried away with all the fun decorations, I needed to figure out how to make this claw machine actually work.
My goal was to create something that kids could interact with, without needing complicated electronics, motors, or any fancy engineering skills.
Because, let’s be clear, we’re crafty over here. Not necessarily mechanically sophisticated!
I came up with a simple two-rope system that allows the claw to move both horizontally and vertically.
How the Left-to-Right Motion Works
I started by placing a piece of lumber across the inside of my open SUV hatch, above the hydraulic lift supports. This is just a piece I had laying around. But it’s roughly a 1X2″. Then, I cut it to the proper width.
This gave me a place to mount the components that would control the movement of my claw.
First, I attached a small eye hook at each end of the board. I marked the proper location for those hooks with the board in place. Then, using rope, elastic, and a metal O-ring, I created a mechanism that could move from side to side.
The horizontal control rope consists of approximately three-quarters regular rope and one-quarter elastic material, connected with a metal ring between them. For the elastic, I used a flat sewing elastic that I had on hand. To make it thicker and stretchier, I crocheted it nice and tight. If you are replicating this, you can also create the same effect by braiding it.
When the rope is pulled, the elastic stretches and allows the claw to move horizontally. Releasing tension allows the elastic to help pull the mechanism back.
It’s a pretty simple concept, but it gave me exactly the movement I needed without any expensive equipment.
DIY TIP: You’ll need to experiment with the tension of your elastic depending on the width of your trunk and the weight of your claw. Too much tension will make the claw difficult to maneuver, while too little may prevent it from returning smoothly.’
How the Up-and-Down Motion Works
Next, I added a second rope to control the vertical movement of the claw and attached a heavy duty fishing magnet to the end. Be sure you leave lots of slack on your ropes. You can cut it to a proper size in the end once you see how much length is going to be necessary.
This rope runs through the right eye hook, then through the center O-ring and extends down to the claw itself.
By pulling or releasing the rope, the operator can raise or lower the claw toward the alien balloons.
So essentially, one hand controls the side-to-side motion, while the other controls the up-and-down movement.
Simple, inexpensive, and surprisingly effective!
Step 2: Making a Faux Claw from Cardboard
Now, you might be wondering how I created an actual claw that could grab the prizes.
Well, I didn’t!
Instead of engineering a functioning mechanical claw, I decided to fake it using a strong fishing magnet.
This made the project significantly easier and allowed me to create the appearance of a working claw machine without having to build a complicated gripping mechanism.
I started by sketching out the shape of my claw onto cardboard and cutting out the individual pieces. If you watch my video closely, you’ll see that the shape at the top of my claw pieces changes slightly. This is because I freehanded the design, and then realized I needed more of an angle to keep the claw wide open with plenty of room for the balloons. So you may have to play with this a little until you get the shape right.
Once I was happy with the shape, I gave everything a coat of metallic spray paint that I already had on hand, then assembled the pieces by gluing them directly onto the rope, just above my fishing magnet.
I also cut a few additional cardboard supports to help stabilize the claw and painted those to match.
Once everything was dry, I threaded my claw onto the mechanism.
We will add tiny magnets to our balloons, so the fishing magnet is what actually does the grabbing!
Rather than trying to physically grip the balloons, the claw simply needs to make contact with a small magnet concealed in each alien’s antenna.
This gives the illusion of a functioning arcade claw machine, but with a fraction of the effort.
DIY TIP: Test your magnets before assembling all your aliens! You’ll want enough magnetic attraction to lift your balloons without making them difficult to release. Also make sure the magnetic connection is strong enough to support the entire balloon.
Step 3: Test Your Claw
Before making all my aliens and decorating the entire trunk, I wanted to make sure my concept actually worked.
I went ahead and preconstructed one antenna onto a balloon and tested the claw’s movement.
I checked that the horizontal rope moved smoothly, the vertical rope could raise and lower the claw, and the magnet could connect with the antennae.
This is also where you’ll want to adjust your rope lengths and elastic tension.
The claw should move easily enough that an adult can operate it without struggling, but it shouldn’t swing wildly or become difficult to control.
I also added an inexpensive Woody toy to the claw.
Not only did this give the display an extra little dose of Toy Story nostalgia, but the added weight helped the claw drop more smoothly when the vertical rope was released.
A little trial and error goes a long way with this part of the project!
TIP: You’ll want to have 2 heavy duty magnet clips. One for each side, to help hold the ropes in place with tension when not in use I used them to grab each rope and magnetized it to the side of my car. Otherwise your ropes will all just collapse when not in use. So the clips help keep everything in place.
Step 4: Making the Alien Prize Containers
I wanted my little green aliens to look like they were sitting inside the claw machine, just like in the movie.
But I also needed somewhere to hide the prizes!
My solution was paper takeout bowls.
Since I couldn’t find any that were already blue, I gave each paper bowl a coat of blue spray paint to coordinate with the aliens’ signature blue uniforms.
Once dry, these bowls became the perfect little holders for my balloon aliens, keeping everyone in place instead of just throwing them willy nilly in the trunk.
They also created a convenient space to tuck small treats and prizes beneath each balloon.
I loved this solution because it made the entire display look more cohesive while keeping the prize setup incredibly simple.
Once they catch a balloon, it exposes their prize. Then we quickly threw a replacement prize into that bowl and reset before the next kid.
Step 5: Creating Toy Story Inspired Alien Balloons
This was easily one of the cutest parts of the entire project!
I started by inflating 30 green balloons. I only needed 24, but wanted to have a few extras just in case.
I wanted them to have that round, slightly squat shape of the little Toy Story aliens rather than the traditional elongated balloon shape. So I over inflated them a little and then pressed down on them firmly while releasing a little air.
As I inflated each balloon, I worked to keep them relatively consistent in size so they would sit neatly together inside the trunk.
Adding the Magnetic Antennae
Here’s where I got pretty clever!
For each alien, I used two matching antenna stickers.
I sandwiched a tiny magnet and a short piece of thick craft wire between the stickers to create a reinforced antenna.
The wire helps the antenna hold its shape, while the magnet gives the claw something to grab.
When applying the second sticker, I was careful to leave the bottom portion of the sticker backing separate so that I still had an adhesive base to attach to the balloon.
Once assembled, I secured the antenna to the top of each balloon.
IMPORTANT: Small magnets can be dangerous if swallowed. Keep them fully enclosed and securely attached, inspect them frequently, and don’t allow children to handle detached antenna pieces.
Giving the Aliens Their Faces
Next came the fun part!
I added the three-eye sticker to the front of each balloon and used a black permanent marker to draw a simple, but cute, little mouth.
Lots of repetition, and just like that, I had an entire army of little green aliens ready to be rescued by The Claw!
Step 6: Decorating the Trunk for a Pizza Planet Theme
With the mechanics working and the aliens assembled, it was finally time to transform the trunk!
I started with two galaxy-print plastic tablecloths.
These were an inexpensive way to cover the interior of my SUV and create that outer-space atmosphere.
I draped the tablecloths across the headliner and carpeted walls of the trunk, securing them neatly with straight pins.
If your vehicle doesn’t have soft surfaces you can pin into, you can do this with tape.
Next, I added purple battery-operated string lights.
These made such a difference in creating that fun arcade atmosphere!
I finished the backdrop with my printed Pizza Planet banner and some additional themed embellishments. Again, I sent my images to Walgreens to print on poster material and then cut them out by hand. I attached them directly to the plastic with hot glue.
At this point, the entire trunk was really starting to come together.
Then, at the very last minute. My 5 year old and I decided we needed a little something more and wanted to conceal the mechanics of the claw a bit. So I threw together a paper banner with images that I edited in canva and cut with my Cricut. A few punched holes and some string and we had the perfect addition to complete the vibe.
Step 7: Setting And Filling The Paper Bowls
Once the backdrop was complete, I arranged all 24 blue bowls inside the trunk and positioned my alien balloons on top.
I wanted the aliens packed closely together to recreate the look of the claw machine from the movie.
Then I filled the containers with little prizes for the kids.
Because the prizes were tucked beneath the balloons, the display stayed neat and colorful while still allowing each alien to function as part of the game.
When a player successfully captured an alien, we could retrieve the prize associated with that balloon.
For this setup, make sure your prize containers are compact enough to be concealed within the depth of your bowls. I purchased the bulk of mine on Temu but also got some at the Dollar Tree. I chose, sticky spiderwebs, halloween multi color pens, stretchy bracelets, and monster teeth, which all fit nicely within the cups.
Information You Need And How It All Worked Out In The End
We had a LONG line of kids that wanted to participate and that line never dwindled, until we ran out of prizes. So be prepared to be engaged the entire time, because this one is a hit.
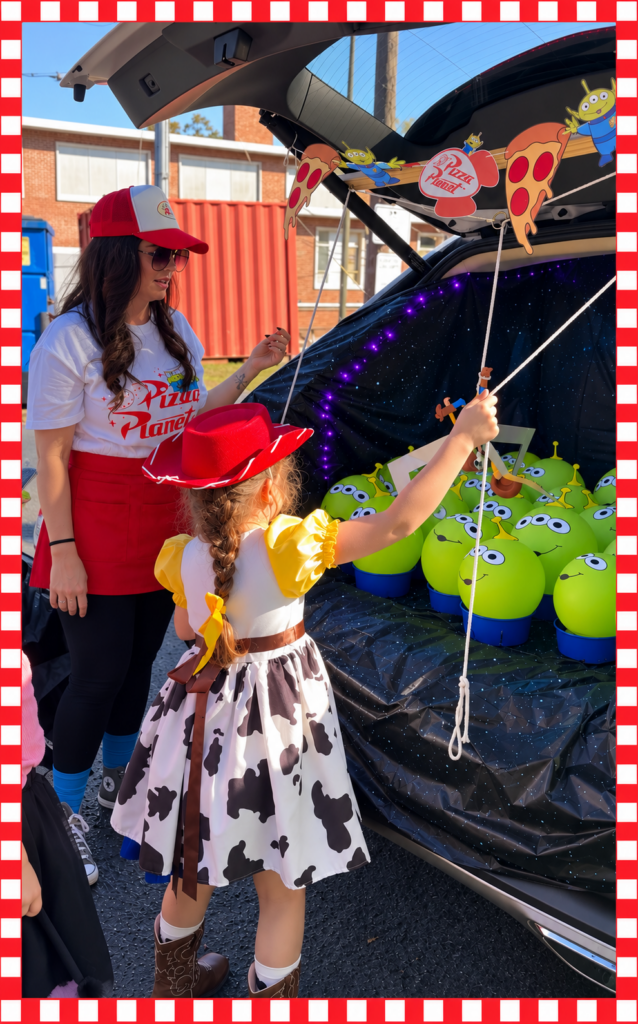
The finished game operates using two simple controls. You need to be sure and explain this to the older kids and help guide them. For a lot of the younger kids, I got behind them and helped them maneuver the controls.
You definitely want at least 2 adults to help operate. I had one side, while my sister had the other. We were there to help tug on the ropes when it was clear help was needed. Some kids handled it completely on their own, while others needed lots of assistance.
We let each kid try until they won. Once lowered, we found it helpful to tug on the vertical rope a bit making the claw bounce and “dance” until they eventually caught a magnet. You’ll be adjusting the balloons back upright and back into their bowls frequently to help keep things moving.
Come with LOTS of prizes. Because it was clear we were going to run out about 30 minutes before the event ended, we ended up removing the prizes from all of the bowls. None of the prizes from your back row will ever get retrieved. For us, it was only those along the line just beneath the claw mechanism. So when prizes got low, we gave each winner a choice from 2 prizes randomly pulled from our aprons.
In the end, I think it was a fun way to make the trunk or treat experience interactive rather than simply handing out candy. And not that I’m bragging or anything. But we did get SHOWERED with compliments on our setup 😉
Additional Decor and Costumes To Complete The Look
I’m sure you noticed a few other details within my photos and video, so I wanted to touch on those items.
Our Costumes: We decided to dress up as Pizza Planet employees, which honestly turned out to be the best decision just for function. Not only were we comfortable and had hats to shade our faces on that sunny day, but our aprons were 100% necessary. They housed extra prizes and made quick swap outs much easier than having a bucket of refills. All the components of our outfits were super cheap. I got our tshirts, aprons, and scrunchy socks off Shein. I grabbed our trucker hats from Walmart and just cut a vinyl sticker to add the logo to the front.
Candy Bowl: I grabbed a green candy bowl from the dollar tree that had a frankenstein image printed on it. I thought I was going to be able to remove that image with acetone, but that didn’t work. So luckily I did have just enough lime green spray paint, so I could coat our bowl with the perfect shade of green. Then just like the balloons, I added a larger vinyl cut sticker and a hand drawn mouth.
Alien Blow Up: Our blow up is actually a sprinkler that we found on clearance at Walmart for an absolute steal. No need for adding a water hose. It just needed a little water in the base of it to add some weight, and I brought my ryobi inflator with me so I could quickly blow it up and deflate it on site.
Coloring Sheet: As I was completing final setup, my daughter requested a Claw coloring sheet to be on theme and keep herself entertained while I was busy with the final details. So I quickly found an image she liked online and printed it off for her. As she was coloring, she voiced that she thought some of her friends would want one too. So we made the last minute decision to print off a stack and hand them out to any of the littles who wanted one. It was a cute addition and I thought it was very sweet of her to think of that.
Frequently Asked Questions
Can you make this Toy Story trunk or treat without a Cricut?
Absolutely! Although I used my Cricut to cut the alien stickers and decorations, you can print the designs onto sticker paper and cut them out with scissors. I’ve included files for those that just want to print directly onto sticker paper and cut it by hand. But heads up! That’s a lot of cutting to do, so prepare yourself for a labor of love.
Do you need a real claw machine mechanism?
Nope! My design uses a cardboard claw, rope, elastic, and magnets to create the illusion of a working arcade claw machine.
How many alien balloons do you need?
I made 30 aliens for my SUV. My layout only required 24, but I wanted to have a few extras for just in case. You can easily adjust the number depending on the size of your trunk. Lay your cups out ahead of time leaving a couple inches of space in between each one to account for balloon width to gauge your required amount. The balloons I purchased came in packs of 15, so I used up 2 packs.
Can this trunk or treat idea work with a smaller vehicle?
Yes! You may need to shorten the overhead support, adjust the ropes, and use fewer balloons, but the overall concept can be adapted to different trunk sizes and designs.
Is this an inexpensive trunk or treat idea?
It definitely can be! I used several materials I already had on hand, including cardboard, spray paint, and some of the rope components. I have lots of supplies at my disposal, so that works to my advantage. So gauge out your costs ahead of time and improvise with supplies where you can.
The biggest opportunities to save money are using inexpensive paper bowls, plastic tablecloths, and DIY printable decorations instead of purchasing elaborate props.
Additional Thoughts for Various Car Types And Rain Plan
Your hatch may be designed different than mine, or you may have a sedan that doesn’t have one. I think this concept can still work with various types of vehicles. You just need to figure out a method for fixing your lumber under the trunk hatch. I think this can be done a variety of ways, including the use of command hooks or zip ties. Just investigate your situation before jumping in and make sure there’s a solid option for your claw mechanism.
Trunk or Treat is typically an outdoor event. But if your organization is like mine, they likely have a rain plan. Luckily we had gorgeous weather, but in the event of rain, our school moves everything into the gymnasium. So I did think through a rain plan ahead of time just in case. My plan was to bring 2 folding tables to set all the bowls and balloons on top of. Then I would use either my clamp on table bar or my freestanding photo backdrop to fix my claw mechanism to across the top. I have these things available from my party supplies, but not everyone has something like that. So be sure you come up with a plan for just in case.