3..2..1....BLAST OFF!!
As the final school bell gears up for its grand mic drop, it’s officially time to shower our teachers with a little end-of-year sparkle. Got “decorate something amazing” on your to-do list? Perfect, because I’ve got a theme that’s ready for liftoff.
We’re going full cosmic.
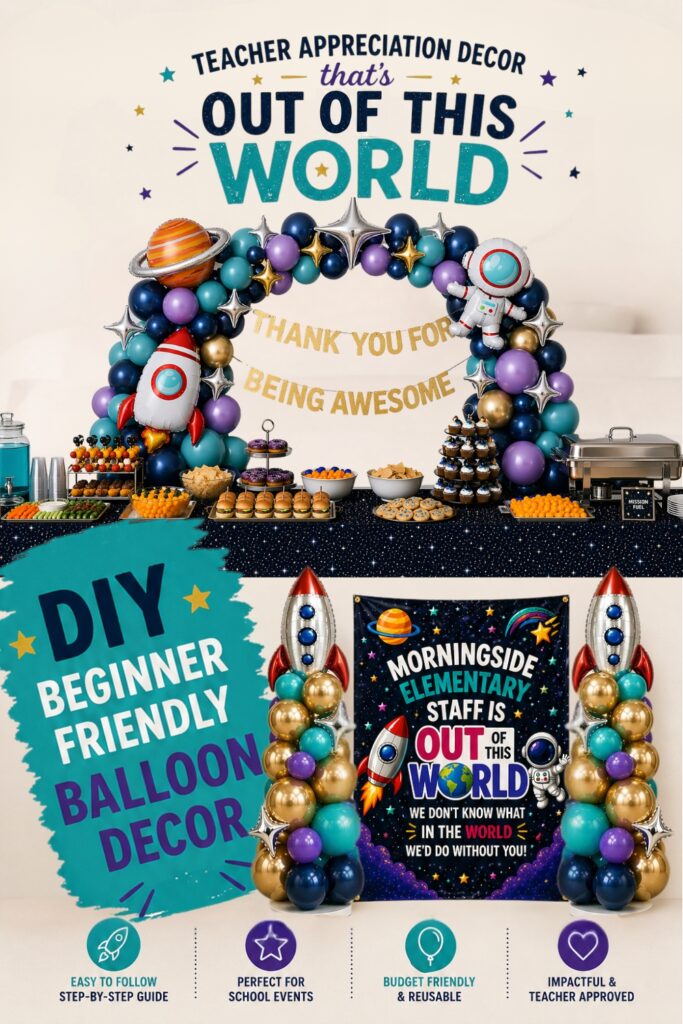
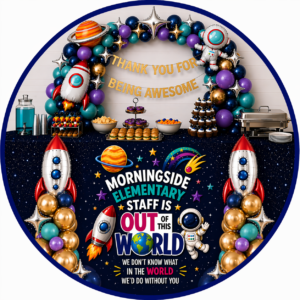
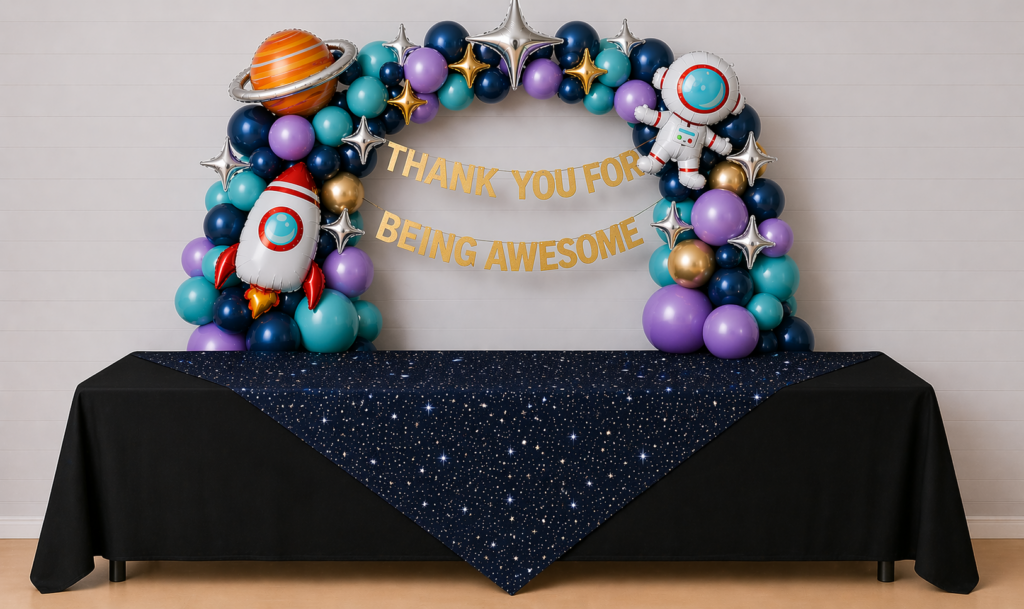
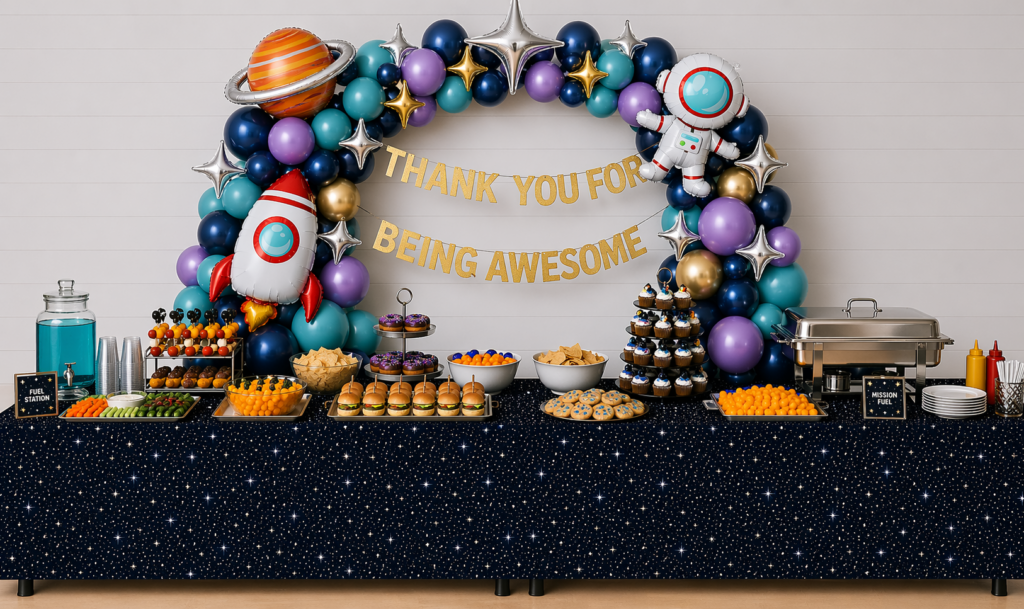
I’ve put together a stellar setup featuring a swoon-worthy entry focal point and a snack table that’s basically a galaxy in disguise. Think orbiting color, playful pops, and just enough wow-factor to make it feel like a celebration from another planet. And here’s the best part: no astronaut-level balloon skills required. Everything is built with simple, budget-friendly cluster systems that come together faster than you can say “blast off.” And I’ve written up a detailed play book to help guide you through this setup with ease.
Translation? Big impact, low stress, maximum sparkle.
Quick heads up before we dive in! All of the pretty mockup photos in this post are AI generated. Not every design I dream up gets brought to life (at least not yet 😉). AI lets me turn the ideas in my head into realistic visuals you can be inspired by. No smoke and mirrors here. I’m not trying to pass anything off as a real event. I use prompts to tweak images to be as close to realistic as possible, then back it all up with step-by-step instructions based on my actual real life experience working with these products. If the day ever comes that I have some IRL photos of this event design, I’ll be attaching those to the end of the post. Now that we have full transparency, let’s do this!
** THIS POST CONTAINS AFFILLIATE LINKS. CLICKING AND PURCHASING FROM THESE LINKS MAY EARN ME A SMALL COMMISSION. SUPPORT MY WORK BY TAKING CARE TO PURCHASE DIRECTLY THROUGH MY LINKS**
Let's Make a Balloon Arch Shall We?
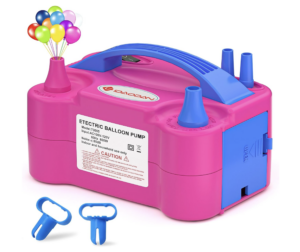
First things first! Don’t even think about attempting a balloon arch without an electric balloon inflator! I have THIS ONE and it has served me well for a few years now. But keep in mind, I find it struggles with the 5″ and double stuffed balloons. For a beginner, this one fits the bill!
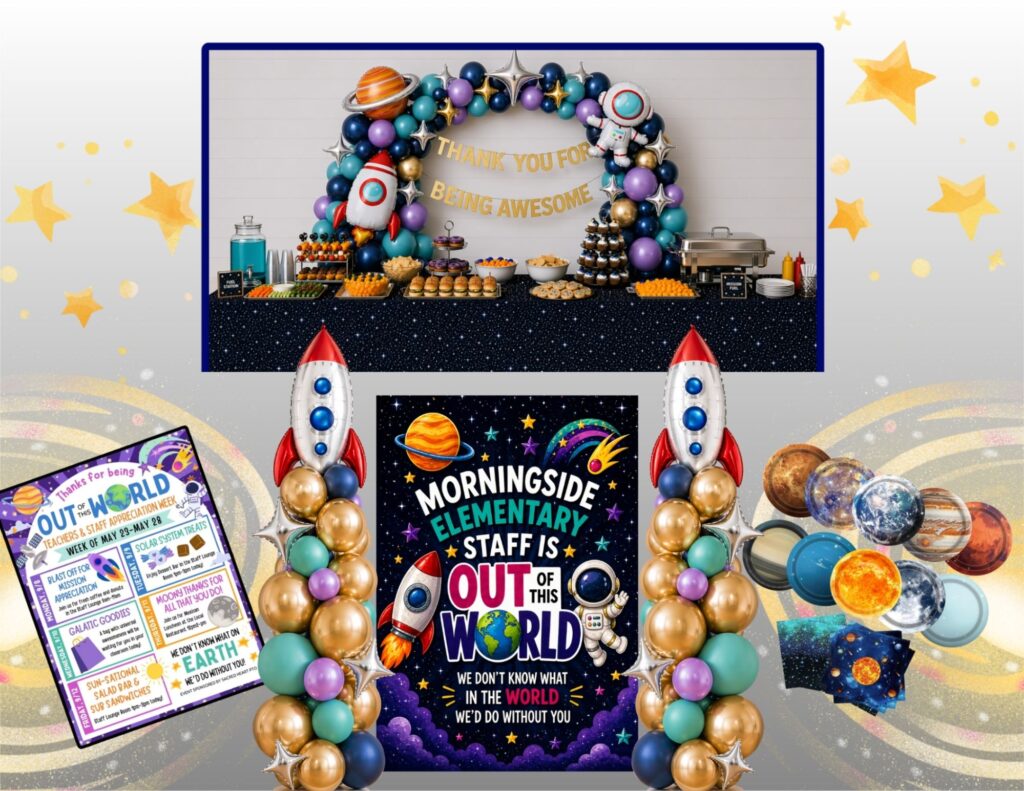
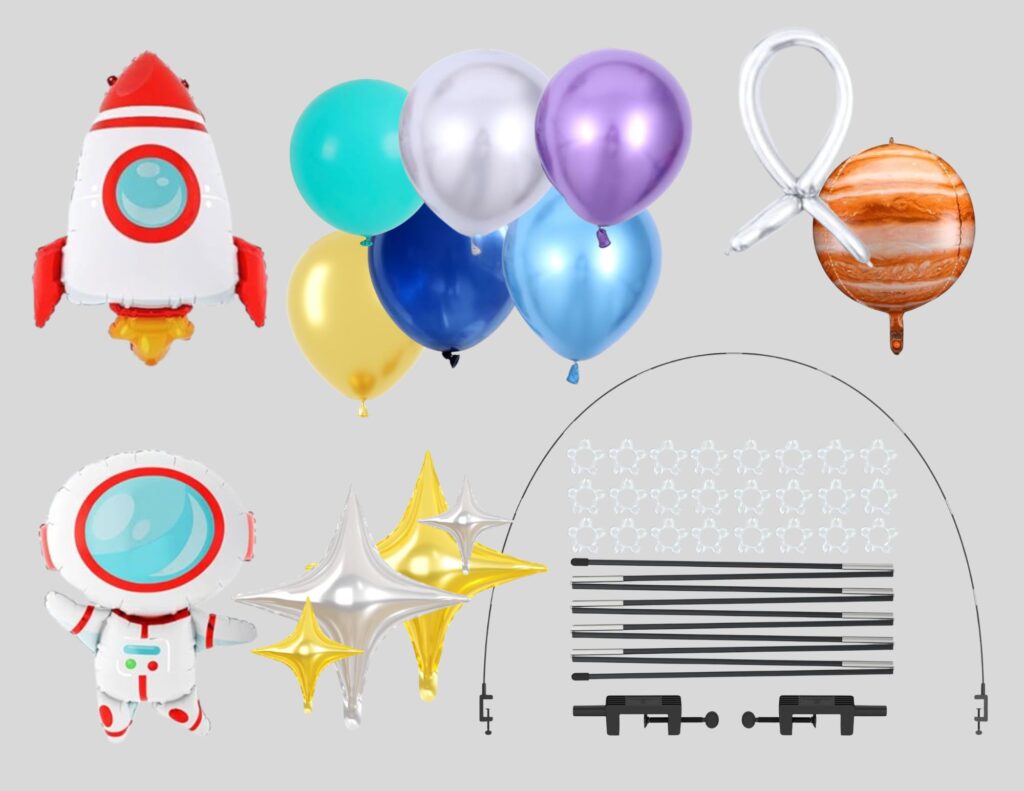
To recreate an arch like my mockup, you’ll need a mix of balloon colors plus a few mylar accents. All easy Amazon finds. I don’t recommend ever using amazon balloons for outdoor/full sun events. But with this, your setup is likely placed in the school, so going the Amazon route shouldn’t be an issue. Here’s a quick collage of the exact shades used in this design. Before you dive in, do yourself a favor and read through the full supply list and step-by-step guide so you’ve got all your options and game plan locked in. A little pre-planning goes a long way here think through your setup, your order of steps, and especially how you’ll transport it before you start.
** THIS POST CONTAINS AFFILLIATE LINKS. CLICKING AND PURCHASING FROM THESE LINKS MAY EARN ME A SMALL COMMISSION. SUPPORT MY WORK BY TAKING CARE TO PURCHASE DIRECTLY THROUGH MY LINKS**
Supplies For The Arch
Clamp on Table Arch Kit – You can create this arch on a freestanding kit as well. But my client wanted this specifically for a food table, so we designed it to incorporate this easy to use clamp on arch.
Outer Space Balloon Kit – This one includes your purple, blues, silver, and the long 260 that you need to create your big ringed planet. It also has the astronaut and rocket ship mylars that are incorporated into the design
Mylar Foil Planets – This pack is the smallest pack I could find that includes that orange planet we need for the arch. Use the extras if you are creating more decor in the teacher’s lounge or around the school. Or if you’ve got plenty of time before you need this, you can order the single balloon from Aliexpress here. Shipping from this source can sometimes be quite slow, so order in advance.
Teal Balloons – Add a pop of teal to complement our color scheme I went with a solid teal here
Gold Balloons – Add a pop of gold to complement our color scheme. This balloon is mostly being used in the columns, so if you don’t plan to make the columns, feel free to omit this one.
Star Shaped Foil Balloons – This kit has both silver and gold in 2 sizes. This is all you need if you plan to only make the arch. But if you want to make the columns as well, you’ll need extra of the silver color, which I’m including with the list below for the columns
Additional Items In This Setup
Galaxy Table Cloth: This galaxy vibe isn’t complete without the tablecloth in my opinion. However, this is a plastic table cloth, and the length of it will not come all the way to the floor on a standard 8 ft table. So I’ve shown it here 2 ways. Either with just the plastic covers. Or using a nicer fabric cloth and layering the plastic just as an embellishment. The plastic can be cut into a square shape or just folded to get this perfectly asymmetrical look.
Black Fabric Table Cloth: For a full drop, I’ve purchased this one before. Tip** Fabric tablecloths are a commonly returned Item on Amazon. I’ve found some really good steals by purchasing a “used like new” option. So keep an eye out for those deals.
Thank You Banner: Attach this directly to your arch, or just attach it to the wall behind.
You’ll need to decide how you want to attach your mylars to the final setup. See my description of this in Step 5 up ahead. For attaching, you’ll either need tape and 260 long balloons, or good quality glue dots
260 Balloons: These are the least expensive ones I could find on amazon. But we all know that can fluctuate, so just look for whatever’s cheap. And don’t forget your tape. You can use painters, packing, or whatever strong tape you have on hand.
Glue Dots: Your Outer space balloon kit comes with some standard glue dots that should work just fine if you want to skip these. But I really like these dots that are specifically designed for balloons to create a strong adhesion
Creating Your Outer Space Themed Balloon Arch
I designed this arch to be easy. Perfect for beginners or anyone who wants a quick, no-fuss setup. If you’ve got a little experience, you can build your own cluster quads and skip the plastic rings for a more polished look. If not, just use the kit as intended. I recommend prepping your balloons the day before so you’re not rushing and have time to adjust if needed. Here’s my step-by-step on exactly how I’d build it and get it ready for transport.
Step 1: Set up a test table as close as possible to your actual one. If you can, use the real table. If not, test a clamp at the venue ahead of time to make sure it fits. Plastic folding tables may need extra support (I used small scrap wood under the clamps when needed). On a 6 ft table, attach at the ends. On 8 ft or longer, you’ll likely need to attach at the back—so test placement accordingly.
Step 2: Attach your poles to the clamps and set the width to match your final setup. Take note of that spacing. These poles flex like tent poles and can break if over-stressed, so adjust your clamps and shape before adding balloons.
Step 3: Start inflating your balloons. This design is intentionally random in color and size, so don’t overthink it. Use the mockup as a guide and fill each ring with 4–5 balloons. For a more polished look, slightly overinflate, then press near the knot against a flat surface to round them out. If you’re making the rocket columns too, set aside plenty of gold balloons in various sizes, plus small amounts of blue, teal, and purple for later.
Check out this review video from the listing where the creator shows how to use the cluster rings. She also shows how she bypasses those and attaches the clusters right to the pole if you prefer to go that route. But note, attaching directly to the pole will make transport more tricky if you need to fully deconstruct. She recommends in the video to attach your plastic pieces and then attach the balloons to those. I however, have always made my clusters and then strung them on to the pole as I go. I’ve never struggled with that method, so just make a judgement call on your preference here. But unless you have a really large vehicle that will fit the full length of your pole with balloons attached. Or if you are fully assembling on location, you are going to be removing these clusters from your pole and have to re thread them on later anyway, so might as well get the hang of that. I tend to make a few clusters, pull out one side of the pole and thread them on, re secure the pole, make a few more clusters, repeat until it’s full.
Step 4: If you are following my method, make yourself a handful of clusters and thread them on to your pole. Continue until you’ve completely filled your pole and the clusters are nice and snug together.
Step 5: Once your standard balloons are looking how you want them, let’s work on adding in our mylars.
Check out this video from @HouseOfParty for quick tips on different ways you can attach those. I mostly only have experience using the glue dot method. However, since this is a teacher appreciation week setup, I’m assuming you’ll be leaving this set up for the entire week. So with that, I’d probably suggest going with the 260 balloon tied on method to make sure nothing moves throughout the week.
Check out this video from @Kove for a closeup on how you should carefully insert your straw for your mylar balloons. I can’t tell you how many balloons have been ruined when others have tried to help me and placed the straw improperly within the valve. If you puncture incorrectly, it’s ruined. Make sure your straw is being placed between the clear film and the red valve guide. I personally prefer to just inflate mylars by mouth, especially when they are small so that I don’t over fill and bust them. But this is your preference.
Once mylars are filled, we can decide where they will be placed. If you are using the glue dot method, you’ll want to just get a visual by holding it up or using a removable piece of painter’s tape, then wait to attach it until your final setup. If you are using the 260 method, you can go ahead and strap these in for a visual, as they can easily be removed and repositioned later.
Check out this video from @partybarco5051 for simple instruction on how to create your ringed planet. You’ll use one of the orange planets from your mylar planet pack and a silver 260 long balloon from your outer space kit.
Place your rocket ship, astronaut, and planet where you like them, then fill in the gaps with stars. You’ll notice I mostly only used the small size stars for this, with just one of the large stars centered at the peak of the arch. This is preference. Make sure you save plenty of your silver stars and gold balloons if you are making the columns as well. Go wild!
Step 6: Now we are going to deconstruct and prepare it for easy transport.
Note, IF you happen to have access to a large van or box truck and want to transport this fully constructed, you absolutely can. I’ve done it, and boy is it a time saver. To leave it fully constructed and ready to just re clamp onto it’s table, I used an 8 ft piece of lumber. Carefully removing the clamps and re-securing them to the board to keep it’s shape. Pro tip! Home depot rents large trucks and vans for roughly $20 an hour. I utilized this for an event where the venue happened to be located very close to a home depot. We got everything set up and the truck returned within our hour!
If you need to fully deconstruct, there are two easy ways I’ve personally done it.
First things first: carefully remove your mylars. Snap a few photos beforehand if you need a reference for reassembly.
Option 1: Pull off each cluster and pack them into large contractor trashbags (mine took about 4). Re-thread them onto the pole when you set back up.
Option 2: As you remove clusters, thread a long string or rope through the centers to keep everything in order. Tie off both ends and you’ve got a flexible garland you can toss in the car. Then just slide them back on in order at setup.
YAY!! You did it.. Now wasn’t that easy?!
** THIS POST CONTAINS AFFILLIATE LINKS. CLICKING AND PURCHASING FROM THESE LINKS MAY EARN ME A SMALL COMMISSION. SUPPORT MY WORK BY TAKING CARE TO PURCHASE DIRECTLY THROUGH MY LINKS**
Supplies For Rocket Ship Columns
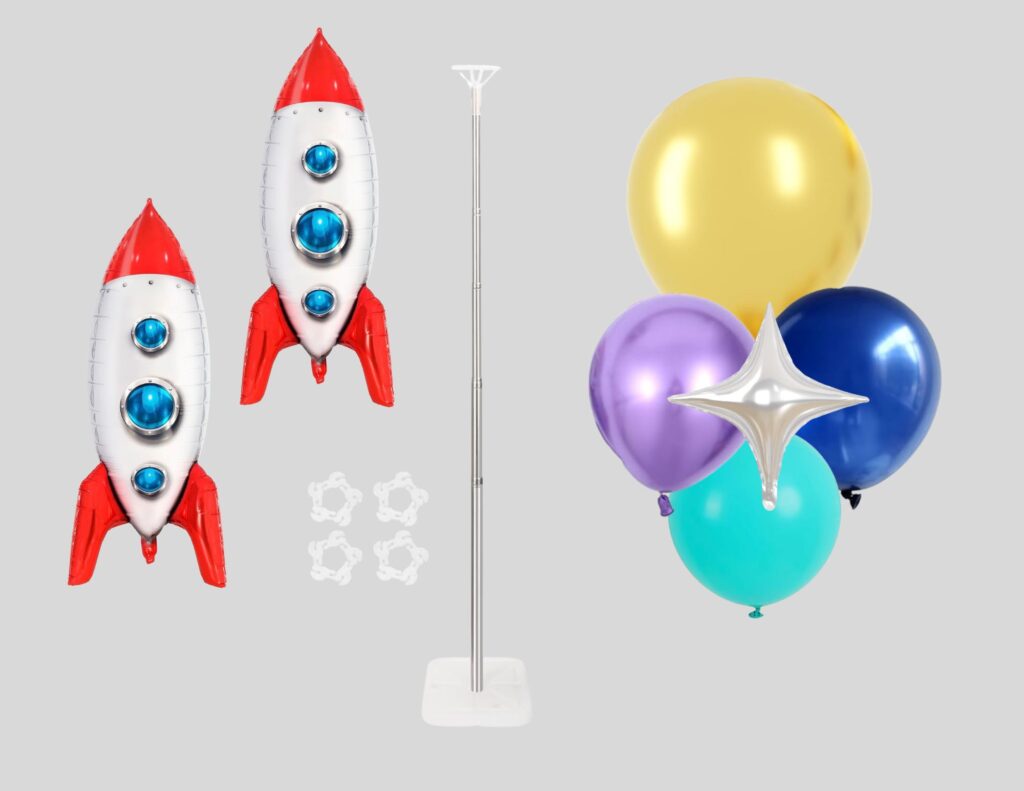
Freestanding Column Kit: There are a lot of options on amazon for free standing columns at a low price. I like these because they use the same plastic cluster rings as our arch and come in a pack of 2. Plus, the telescopic design allows you to adjust your height.
Gold Balloons: This is a big pack of gold balloons in various sizes that should be more than enough to create 2 columns. I also linked these above. You only need one pack to create both projects.
Teal Balloons: This is the same kit I linked for the arch. Again, you only need one pack to create both.
Purple & Blue Balloons: These are from our outer space kit. But if you aren’t making the arch, consider purchasing this set instead. It’s got our purples and blues, plus a fun galaxy printed balloon that would be a great addition and tie in well.
Rocketship Foil Mylars: These are a whopping 33″ long to make a blast off statement on your columns
Star Shaped Foil Mylars: this is a set of just silver color since that’s the only one we are using on our columns. If you are only making the columns, you can just pick up this pack and skip the mix pack I listed with the arch. There’s 6 small ones in this pack. My mockup shows only 3 used on each column, so that should do it. But if you want more stars, grab 2 packs, as the large size will likely be way too big for this design.
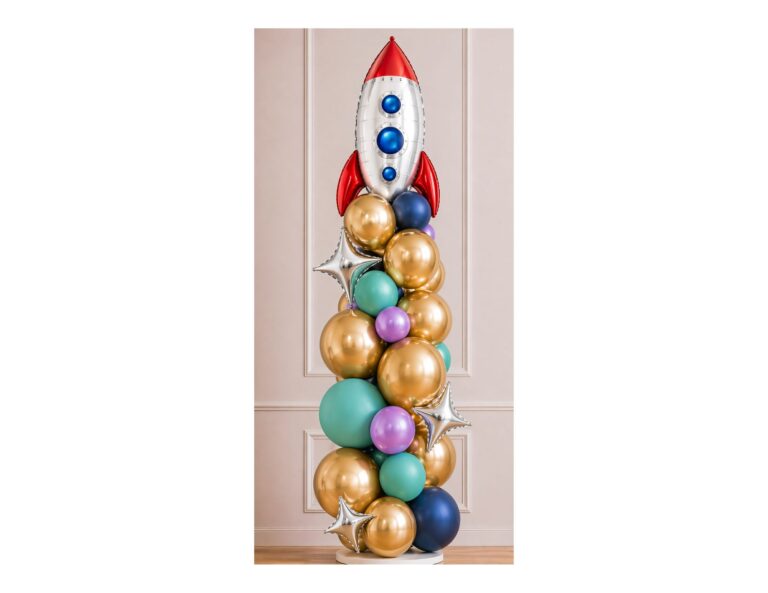
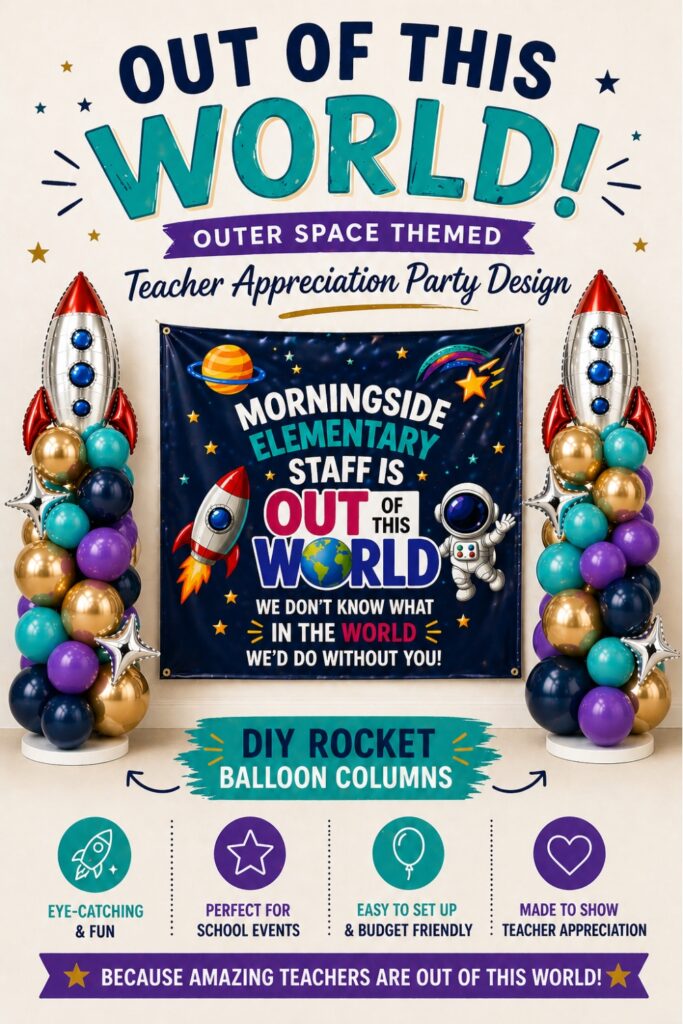
Creating Your Rocket Ship Balloon Columns
Step 1: Build your columns first, and make sure to fill the bases with water so they stay put.
Step 2: Inflate your balloons and start making clusters with the plastic rings. Keep them mostly gold, with just one small colored balloon in each cluster for a little sprinkle of color. Stack as you go so you can adjust the shape and placement along the way.
I recommend building both columns at the same time so your sizing and color placement stay consistent. Similar, not identical, is the goal.
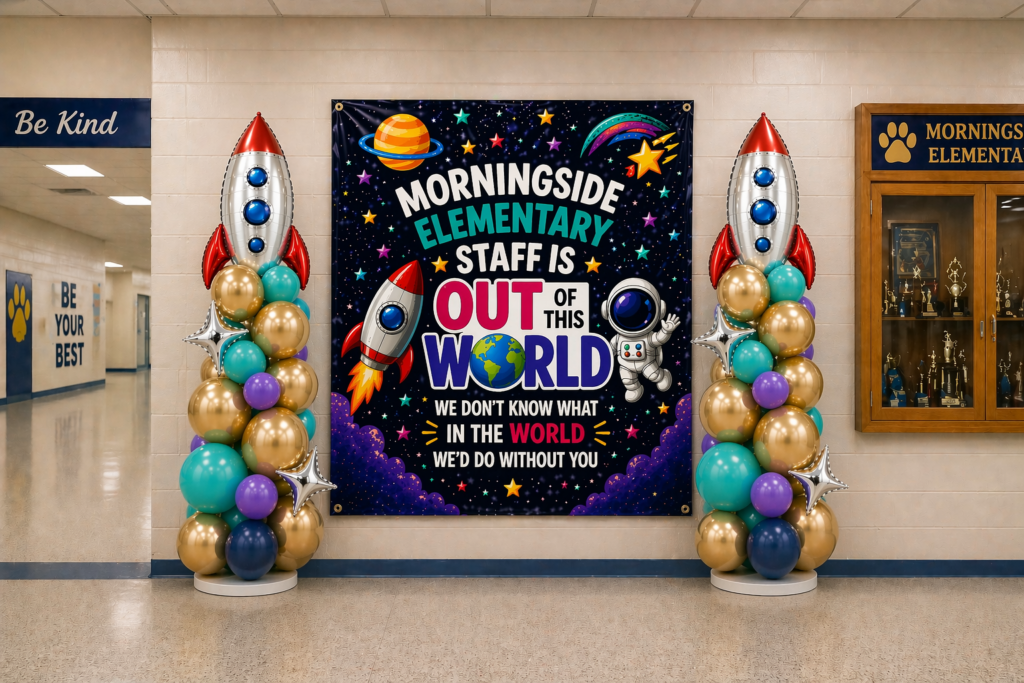
Step 3: Once you’ve got the standard balloons where you want them, stop there. Since these were designed to flank a 6 ft banner, I’d aim for about 55″ tall before adding the rockets. The rockets will add roughly another 30″ of height.
Step 4: Inflate your mylars. You’ll need one rocket and at least 3 small stars per column. Be extra careful with the mylars, they’re easy to overfill.
Again, here’s the link for the closeup on how to open up that valve in the balloon without damaging created by @kove, in case you skipped over the arch section.
Attach your rocket mylars to the top of each column. The kit hardware usually does the trick, but if your rocket starts to flop, add a 260 balloon. Tie it to the base of the rocket, pull it tight, and anchor it lower down in the column. That tension will keep it upright.
Here’s a video from @houseofparty demonstrating what I mean
Step 5: Attach your star shaped mylars. Using either glue dots or the 260 balloon tied method, sprinkle in at least 3 of the silver small size stars asymmetrically.
Again, here’s a video from @houseofparty showing those attachment methods if you skipped over the arch section.
Transport: You can deconstruct and transport this in pieces if you like. Just be sure you don’t glue dot any of your stars in place until final set up.
TaDaaaa!!
Purchase Additional Elements In my Design
Out Of This World Weekly Itinerary Digital File – The whole color scheme and vibe of my design was created using this digital file purchased on Etsy as inspiration. The file allows you to create a weekly itinerary so the teachers know what to expect for your daily gestures. My client is customizing and printing these off to hand out to the teachers as well as having a larger printout created to display on the food table.
Planet Inspired Plate Set – My client’s itinerary involved provided food for the teachers each day. So of course we needed some themed plates to complement the vibe!
Custom Teacher Appreciation Banner – I designed this banner for my client and will be adding the listing for it to my Etsy Shop. That shop is currently under a rebrand. So for now, you can reach out to me directly and I can set you up with a private invoice to create and send the file to you to be printed via your own method. Or I can submit the image to have a completed banner drop shipped to you directly. Reach out to me at craftygalconfessions@gmail.com to inquire and I’ll get it to you with a quick turnaround.
BONUS POINTS! Add Some Cosmic Flair to The Teacher's Lounge
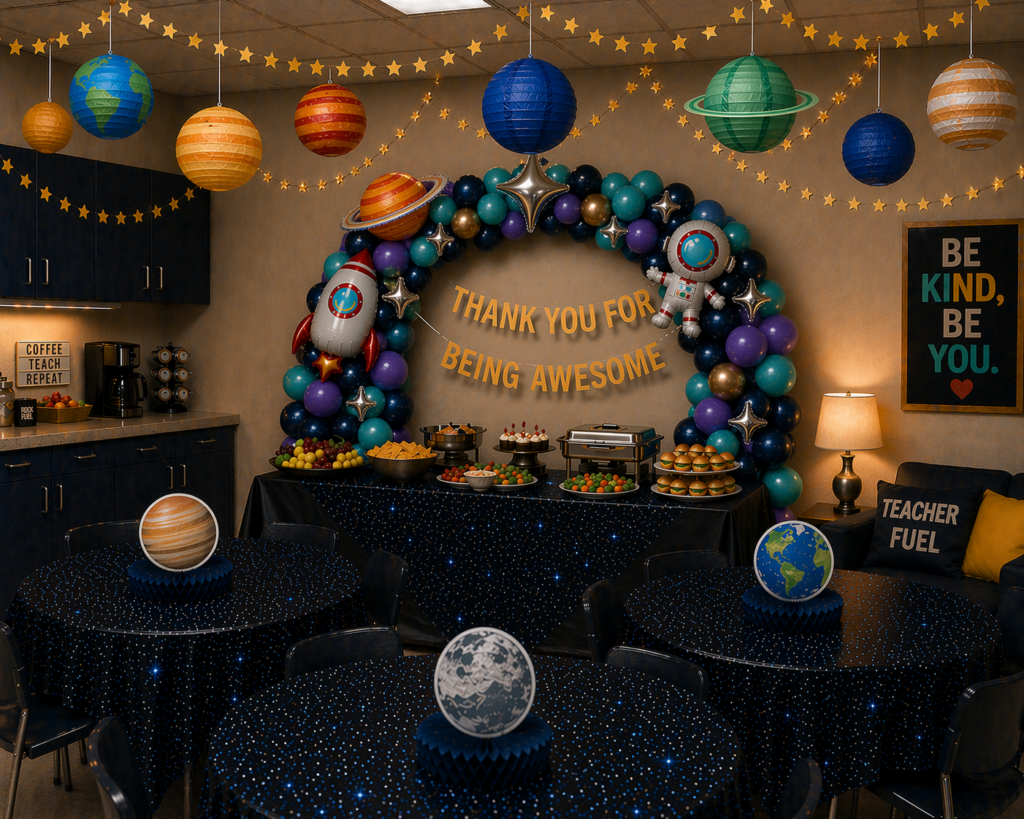
My client doesn’t have a teacher’s lounge to decorate, but you might! Carry the vibe throughout the lounge with some simple themed decorations using the same tablecloth and some easy to throw together paper planets. Here’s a list of the extras you see in this mockup.

Vibe Check! Wanna Work With Me?
I help party people like you create cohesive, swoon-worthy designs without the “Wait…why did I buy this?” cart chaos or the price tag of a full-service event planner.
If you want a celebration that actually makes sense (visually and financially), you’re in the right place. I specialize in turning your theme into a polished plan that fits your budget, your space, and your skill level. No overwhelm, no random Amazon spiral purchases… Just a clear, doable design that looks like you hired a pro.
Need something simple? My most cost-effective option is a custom mockup that brings a cohesive and thoughtful aesthetic together, complete with shoppable affiliate links. Want a little more attention? We can schedule a consult where I virtually walk through your event space. Together, we can address your ideas and concerns to map out a more detailed game plan. Ready to go fully custom? After all, I am the Crafty Gal over here, so I can craft up one-of-a-kind, done-for-you pieces that ship straight to your door.
Send me your vision, and I’ll map out options to bring it to life, along with straightforward pricing. Easy, intentional, and just the right amount of extra.
Reach out to me at CraftyGalConfessions@gmail.com to inquire.